ButtonFun
NSString *title = [sender titleForState:UIControlStateNormal];

NSString *newText = [[NSString alloc] initWithFormat: @"%@ asldjhfaklsjdfh.",title];

statusText.text = newText;

[newText release];


-alloc- { TheClass *newObject = [[TheClass alloc] init]; }
TextField
//Done키를 누르면 키보드 사라지게 하기
-(IBAction)textFielddoneEditiing:(id)sender {
[sender resignFirstResponder];
}
//배경을 터치하면 키보드 사라지게 만들기
-(IBAction)backgroundTap:(id)sender {
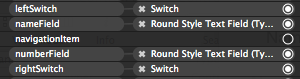
[nameField resignFirstResponder]; //텍스트필드 1
[numberfield resignFirstResponder];//텍스트필드 2
}
//중요한건 인터페이스 빌더에서 아울렛 연결을 해줘야 한다는 점이다.
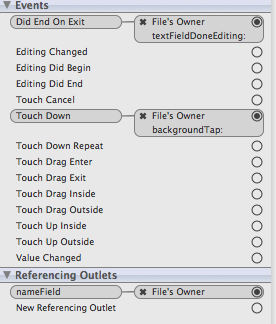
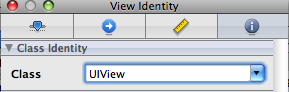
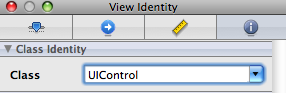
//더 중요한건 File`Owenr에 View의 Identity를 다음과 같이 변경해야 한다.
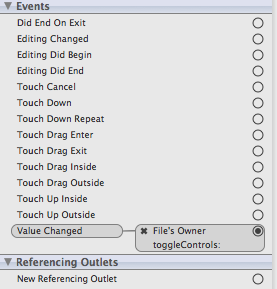
//그리고 더더욱 중요한건 사과+2를 누른후 Touch Down을 다음과 같이 연결해 줘야 한다.

Slider
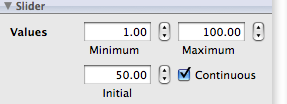
-(IBAction)sliderChanged:(id)sender {

UISlider *slider = (UISlider *)sender; //sender의 타입을 UISlider * 로 봐꾼다.

int progressAsInt = (int)(slider.value + 0.5f);//Slider의 값에(value) 0.5를 더해 반올림한뒤 값을 int타입으로 얻는다.

NSString *newText = [[NSString alloc] initWithFormat:@"%d",

progressAsInt]; //슬라이더의 값을 새로 문자열을 만들어 라벨의 텍스트로 사용.

sliderLabel.text = newText;

[newText release];

}
//슬라이더의 최소값부터 최대값 설정하기.
//슬라이더의 아울렛 연결
Switch,button,toggleControls
-(IBAction)toggleControls:(id)sender { //분할 컨트롤을 눌렀을때 호출된다. 스위치를 와 버튼을 숨기고 나타내는 역활
if ([sender selectedSegmentIndex] == kSwitchesSegmentIndex)
{
leftSwitch.hidden = NO;
rightSwitch.hidden = NO;
doSomethingButton.hidden = YES;
}
else
{
leftSwitch.hidden = YES;
rightSwitch.hidden =YES;
doSomethingButton.hidden =NO;
} //스위치가 나타날때 버튼을 나타나지 않고, 스위치가 나타나지 않을때 버튼이 나타남.
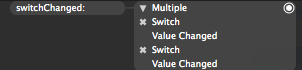
-(IBAction)switchChanged:(id)sender { //두 스위치중 하나를 눌렀을때 호출됨.
UISwitch *whichSwitch = (UISwitch *)sender; //값을 모두 바꿈.
BOOL setting = whichSwitch.isOn;
[leftSwitch setOn:setting animated:YES]; //animated 이 인자는 버튼이 실제로 누른 것처럼 천천히
[rightSwitch setOn:setting animated:YES];//미끄러지는 효과를 줌.
}
//File's Owner로부터 각각의 스위치 아웃렛 연결
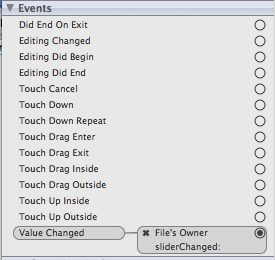
//Value Changed로부터 switchChanged 연결을 해준다.
//분할 스위치의 Value Changed를 toggleControls:로 연결해준다.
ButtonAction (액션시트와 경고창)
<UIActionSheetDelegate>델리게이트 추가.
----------------------------------------------------
//액션시트
-(IBAction)buttonPressed {
UIActionSheet *actionSheet = [[UIActionSheet alloc] //UIActionSheet의 객체 할당, 초기화
initWithTitle:@"Are you sure?" //액션시트의 제목
delegate:self //actionSheet:didDismissWithButtonIndex:를 self로 호출
cancelButtonTitle:@"No Way!" //취소의 (버튼)제목
destructiveButtonTitle:@"Yes, I`m Sure!" //종료 (버튼)제목
otherButtonTitles:nil];//사용할 버튼의 수 결정하는 부분
[actionSheet showInview:self.view]; //화면상에 액션시트를 출력하는 코드
[actionSheet release];
}
//경고창
-(IBAction)actionSheet:(UIActionSheet *)actionSheet
didDismissWithButtonIndex:(NSInteger)buttonIndex
{
if (buttonIndex != [actionSheet cancelButtonIndex]) //사용자가 취소버튼을 누르지 않았는지를 알수 있다.
{
NSString *msg = nil;
if (nameField.text.length > 0)
msg = [[NSString alloc] initWithFormat:
@"You can breathe easy, %@, everything went OK.",
nameField.text];
else
msg = @"You can breathe easy, everything went OK.";
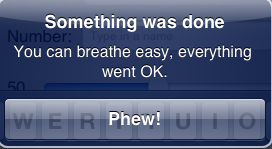
UIAlertView *alert = [[UIAlertView alloc]
initWithTitle:@"Something was done"
message:msg
delegate:self //nil로 봐꾸면 사용자가 경고 뷰를 닫을때 알려줄 필요가 없다는 것을 알려줌
cancelButtonTitle:@"Phew!"
otherButtonTitles:nil];
[alert show];
[alert release];
[msg release];
}
}//액션시트

//경고창
ViewDidLoad에서의 버튼 이미지 설정
- (void)viewDidLoad {
UIImage *buttonImageNormal=[UIImageimageNamed:@"whiteButton.png"];
//크기를 늘릴수 있는 이미지
UIImage *stretchableButtonImageNormal = [buttonImageNormal
stretchableImageWithLeftCapWidth:12 topCapHeight:0];
[doSomethingButton setBackgroundImage:stretchableButtonImageNormal forState:UIControlStateNormal]; //control states 제어상태
UIImage *buttonImagePressed=[UIImageimageNamed:@"blueButton.png"];
//크기를 늘릴 수 있는 이미지
UIImage *stretchableButtonImagePressed = [buttonImagePressed
stretchableImageWithLeftCapWidth:12 topCapHeight:0]; //끝마개 12
[doSomethingButton setBackgroundImage:stretchableButtonImagePressed
forState:UIControlStateHighlighted]; //highlighted state 강조된 상태
[super viewDidLoad];
}
-버튼의 이미지 붙이기-
완전 이미지 크기 자체가 다름에도 불구하고 이렇게 간단한 코드로
버튼의 딱 맞게 이미지를 붙여넣을 수 있다.
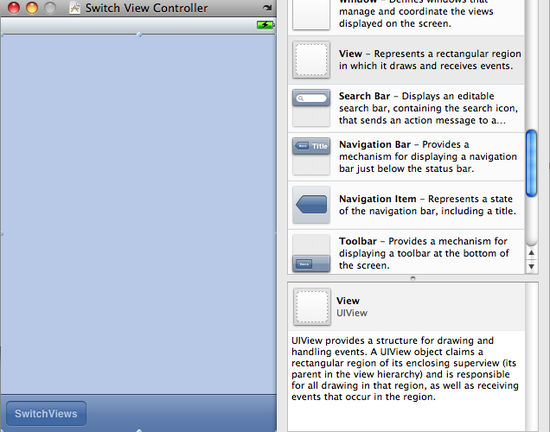
인터페이스 빌더 에서의 button의 Type변경을 Custom으로 변경해주어야 한다.MutiView
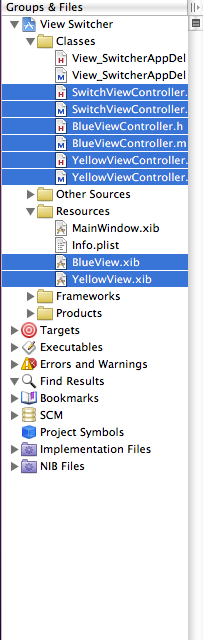
먼저 처음에 보여줄 최상위 뷰의 SwitchViewController와
툴바를 이용하여 보여줄 BlueViewController,YellowViewController를 만들고
Xib파일을 만들어 준다.
Window-based Application으로 생성하였기 때문에
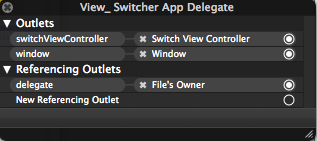
델리게이트 수정을 통해 최상위 컨트롤러의 뷰를 추가하는 코드를 작성해야 한다.
View_SwitcherAppDelegate.h
@class SwitchViewController;
SwitchViewController *switchViewController;
//최상위 컨트롤러를 가르키는 아웃렛
@property (nonatomic, retain) IBOutlet SwitchViewController *switchViewController;
메인 위도우에 최상위 컨트롤러의 뷰를 추가하기 위해서 위의 코드의 작성이 필요하다.
View_SwitcherAppDelegete.m
#import "SwitchViewController.h"
@synthesize switchViewController;
-(void)applicationDidFinishLaunching:(UIApplication *)application {
[window addSubview:switchViewController.view]; //메인위도우에 최상위 컨트롤러의 뷰를 추가
}
-(void)dealloc {
[switchViewController release];
}
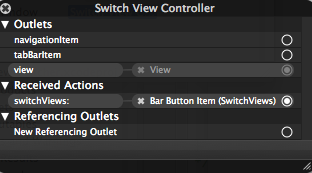
//전환해서 보여 줄 뷰 컨트롤러와 전화해서 숨길 뷰 컨트롤러용 포인터 두개를 포함할 액션 메서드 생성
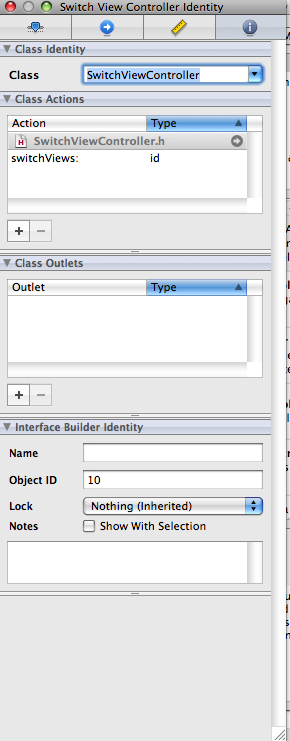
SwithchViewController.h
@class BlueViewController;
@class YellowViewController;
YellowViewController *yellowViewController;
BlueViewController *blueViewController;
@property (nonatomic, retain)YellowViewController *yellowViewController;
@property (nonatomic, retain)BlueViewController *blueViewController;
//최상위 컨트롤러 인스턴스를 나타내는 아이콘 추가
//방금 UIViewController를 추가했지만 실제로는 SwitchViewController의 인스턴스가 필요하므로
//뷰 컨트롤러의 클래스를 SwitchViewController로 봐꿔야 한다.
//최상위 컨트롤러의 컨텐츠 뷰를 만들고 툴바 뷰를 만든다.
//SwitchViews버튼의 아웃렛 연결을 File's Oner의 switchView:액션에 연결한다.
//View_SwitcherAppDelegate를 File's Onew에 switchViewController로 연결한다.
//최상위뷰 컨트롤러 생성 (Switch Views버튼 클릭시 노란 뷰와 파란 뷰로 전환)
SwitchViewController.m
#import "BlueViewController.h"
#import "YellowViewController.h"
@synthesize yellowViewController;
@synthesize blueViewController;
//nib이 로드될 때 호출되는 UIViewController의 메서드
- (void)viewDidLoad {
//오버라이드 해서 BlueViewController의 인스턴스를 만들고 initWithNibName메서드를
//이용하여 BlueView.xib 파일에서 BlueViewController 인스턴스를 로드한다.
//BlueViewController의 인스턴스를 만들고 나서 BlueViewController의 프로퍼티로
//할당한다.
BlueViewController *blueController = [[BlueViewController alloc]
initWithNibName:@"BlueView" bundle:nil];
self.blueViewController = blueController;
//파란뷰를 최상위 뷰로 추가 인덱스를 0으로 해서 다른뷰의 뒤에 놓이게 함.(툴바가 보이게 함)
[self.view insertSubview:blueController.view atIndex:0];
[blueController release];
[super viewDidLoad];
}
-(IBAction)switchViews:(id)sender
{
if (self.yellowViewController.view.superview == nil)
{
//YellowViewController의 인스턴스 생성
if (self.yellowViewController == nil)
{
YellowViewController *yellowController =
[[YellowViewController alloc] initWithNibName:@"YellowView"
bundle:nil];
self.yellowViewController = yellowController;
[yellowController release];
}
[blueViewController.view removeFromSuperview]; //bluewView삭제
[self.view insertSubview:yellowViewController.view atIndex:0];//yellowView추가
}
else
{
if (self.blueViewController ==nil)
{
BlueViewController *blueController =
[[BlueViewController alloc] initWithNibName:@"BlueView"
bundle:nil];
self.blueViewController = blueController;
[blueController release];
}
[yellowViewController.view removeFromSuperview];
[self.view insertSubview:blueViewController.view atIndex:0];
}
}
//지연 로딩을 통해서 메모리의 누수 관리
- (void)didReceiveMemoryWarning {
[super didReceiveMemoryWarning];
//사용자에게 보여지고 있는 뷰가 어느 것인지를 확인하고 컨트롤러에 nil을 할당하여 다른 뷰가
//참조할 수 없도록 컨트롤러를 해제시킨다.
if (self.blueViewController.view.superview == nil)
self.blueViewController = nil;
else
self.yellowViewController = nil;
}
//콘텐츠 뷰 구현하기
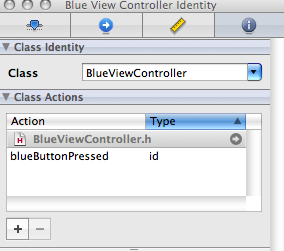
BlueViewController.h
-(IBAction)blueButtonPressed;
YellowViewContorller.h
-(IBAction)yellowButtonPresses;
//BlueViewController클래스가 BlueView.xib을 디스크로부터 로딩하게 만들기
File's Owner의 기본값을 NSObject에서 BlueViewController로 변경한다.
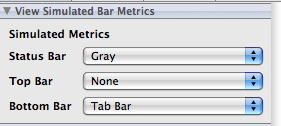
다음과 같이 View의 속성을 다음과 같이 봐꿔준다.(버전이 않맞아서 ToolBar가 없다...그래서 Tab Bar로 대체했다.)
뷰가 전체를 차지하게 해놓으면 설정해놓은 툴바의 공간을 뷰가 차지 함으로 툴바가 보이지 않는것을 방지하기 위해
이런 과정을 거친다. 소스 코드로도 이 툴바뒤로 뷰가 자리하도록 코딩이 되어있다.
버튼을 추가하고 File's Owner에 blueButtonPressed액션 메서드를 Touch Up Inside 이벤트를 연결한다.
추가한 액션메서드에 경고창 코드를 입력한다.
-(IBAction)blueButtonPressed
{
UIAlertView *alert = [[UIAlertView alloc]
initWithTitle:@"Blue View Button Pressed"
message:@"You pressed the button on the blue view"
delegate:nil
cancelButtonTitle:@"Yep, I did."
otherButtonTitles:nil];
[alert show];
[alert release];
}
-(IBAction)yellowButtonPressed
{
UIAlertView *alert = [[UIAlertView alloc]
initWithTitle:@"Yellow View Button Pressed"
message:@"You pressed the button on the Yellow view"
delegate:nil
cancelButtonTitle:@"Yep, I did."
otherButtonTitles:nil];
[alert show];
[alert release];
}
전환 시 애니메이션 주기
SwitchViewController.m에서 switchViews: 메서드에 아래의 코드를 추가한다.
-(IBAction)switchViews:(id)sender
{
//뷰 전환 에니메이션 추가 beginAnimations:context:
[UIView beginAnimations:@"View Flip" context:nil];
[UIView setAnimationDuration:1.25];//변환돼는 시간
//시작과끝은 느리지만 중간에는 빠른 전환을 보여 자연스러운 효과를 줌
[UIView setAnimationCurve:UIViewAnimationCurveEaseInOut];
// if (self.yellowViewController.view.superview == nil)
// {
// //YellowViewController의 인스턴스 생성
// if (self.yellowViewController == nil)
// {
// YellowViewController *yellowController =
// [[YellowViewController alloc] initWithNibName:@"YellowView"
// bundle:nil];
// self.yellowViewController = yellowController;
// [yellowController release];
}
//트랜지션의 4가지 효과 FlipFromRight,FlipFromLeft,CurlUp,CutlDown
[UIView setAnimationTransition:
UIViewAnimationTransitionFlipFromRight
forView:self.view cache:YES];
[blueViewController viewWillAppear:YES];
[yellowViewController viewWillDisappear:YES];
//[blueViewController.view removeFromSuperview]; //bluewView삭제
// [self.view insertSubview:yellowViewController.view atIndex:0];//yellowView추가
[yellowViewController viewDidDisappear:YES];
[blueViewController viewDidAppear:YES];
}
else
{
// if (self.blueViewController ==nil)
// {
// BlueViewController *blueController =
// [[BlueViewController alloc] initWithNibName:@"BlueView"
// bundle:nil];
// self.blueViewController = blueController;
// [blueController release];
}
[UIView setAnimationTransition:
UIViewAnimationTransitionFlipFromLeft
forView:self.view cache:YES];//cache는 시작할 때 뷰의 스냅샷을 찍어서 매 단계마다 다시 그리지 않고 이미지를 이용해 뷰를 그리는 속도를 높여 준다.
(애니메이션을 진행하는 동안 뷰의 모습이 바뀌지 않으면 항상 캐쉬를 사용한다.
//사용하지 않는 다음의 메서드를 두번씩이나 호출을 한 것의 중요한 이유로는
미래에 사용하게 될 사태에 대비하여 문제가 발생하지 않도록 하는 역활을 한다.
다시 말하면, 좀더 유연한 코드가 되도록 코딩을 한것임.
[yellowViewController viewWillAppear:YES];
[blueViewController viewWillDisappear:YES];
// [yellowViewController.view removeFromSuperview];
// [self.view insertSubview:blueViewController.view atIndex:0];
[blueViewController viewDidDisappear:YES];
[yellowViewController viewDidAppear:YES];
}
[UIView commitAnimations];
}
Picker(1)
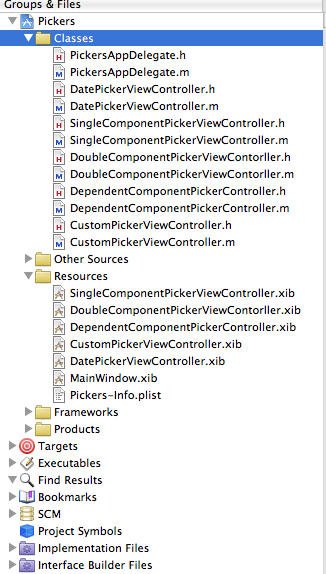
다섯개의 파일을 생성한다.
DatePickerViewContorller,SingleComponentPickerViewController,DoubleComponentPickerViewController,
DependentComponentPickerViewController,CustomPickerViewController
-최상위뷰 컨트롤러 생성-
.h 파일에
UITabBarController *rootController; //빌드상에서 UITabBarController의 인스턴스가 된다.
아웃렛 설정까지 해준다.
.m파일에
addSubview해준다.
[window addSubview:rootController.view]; //윈도우 베이스로 했기 때문에 작성을 직접 하는것. 뷰베이스로 하면
//설정되어 있음.
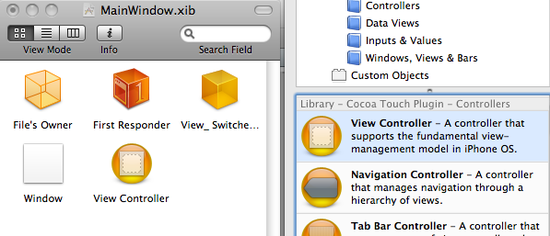
MainWindow.xib에서 Tab BarController 를 드레그 해서 MainWindow.xib에 넣는다.
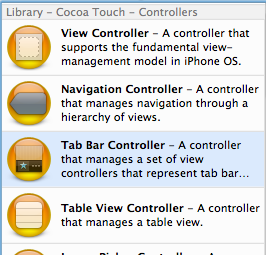
이 Tab Bar Controller가 이제 최상위 컨트롤러가 된다.
TabBarController 아이콘을 클릭해서 속성 인스펙터를 실행한다.
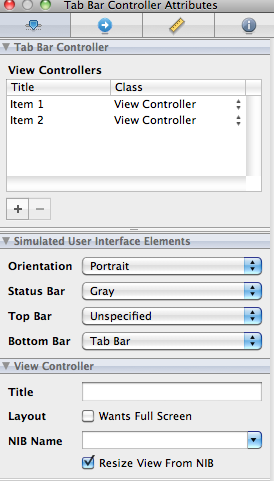
여기서 ViewController 를 살펴보면 간단하게 탭바의 메뉴를 늘릴 수 있는 것을 알수 있다.
5개로 늘립니다.
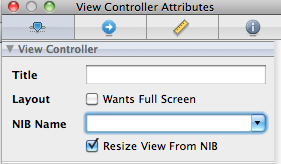
첫번째 탭바를 클릭하면 위와 같이 나타난다. 여기서 DatePickerViewController 를 선택한다.
아래의 Resize View From NIB은 크기 조절 기능으로 필요하지 않으므로 해체한다.
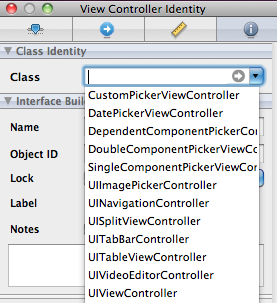
아이덴티티 인스펙터에서 클래스를 DatePickerViewController로 변경합니다.
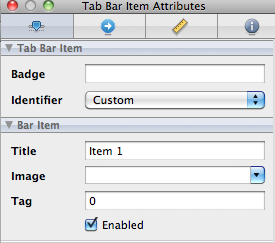
탭바의 첫번째 탭을 클릭하고, 동일한 지점을 다시 클릭합니다.
그럼 위와 같은 그림이 나오는데 여기서 제목과 아이콘을 설정 해줍니다.
나머지 4개의 버튼도 마찬가지로 설정해줍니다.

그리고 마지막으로
PIckers App Delegate 아이콘을 드래그 해서 Tab Bar Controller 아이콘으로 가져다 놓고,
rootController아이콘을 선택합니다.
ButtonAnimation (appsNext)
<object type='application/x-shockwave-flash' id='UaGhuYWaGt8$' width='642px' height='390px' align='middle' classid='clsid:d27cdb6e-ae6d-11cf-96b8-444553540000' codebase='http://fpdownload.macromedia.com/pub/shockwave/cabs/flash/swflash.cab#version=9,0,0,0'><param name='movie' value='http://flvs.daum.net/flvPlayer.swf?vid=UaGhuYWaGt8$' /><param name='allowScriptAccess' value='always' /><param name='allowFullScreen' value='true' /><param name='bgcolor' value='#000000' /><param name='wmode' value='opaque' /><embed src='http://flvs.daum.net/flvPlayer.swf?vid=UaGhuYWaGt8$' width='642px' height='390px' allowScriptAccess='always' type='application/x-shockwave-flash' allowFullScreen='true' bgcolor='#000000' ></embed></object>


버튼 클릭시 다른 뷰 보이기

드디어 발견.
10년이 넘은 글인데 이제 와서 보니 그저 낙서장이지만 이게 뭐라고.. 열심히 했던 그 시절 그 때 그 느낌 때문에 간직한다.
댓글